Latest Updates

Add Author Bio Box or About Me Widget In Blogger Home Page

By on Saturday, November 14, 2015
Slider Author Bio Box
We have already learned about facebook widget in previous article. Today's post it is very essential for those viewer who want to make a professional design of blog and want to make a attractive blog for visitors. I have a small tutorial about how to add author bio box widget to blogger footer. This is a beautiful author bio box widget which will be added in the blogger footer. As you know an author box can include information such as author's name, profile, blog and will be having a picture of the founder & author in the blogger footer which will move upon user mouse cursor. It is very stylish widget for a blog or website and it will make attractive for viewer eyes who are landing on your website. so let's start how to add author bio box widget in your blogger blog.

How To Add Author Box Or About Me In blogger

Before adding a author bio box widget, You just need to add below code in your blog site home page footer. Please follow the simple tutorial step by step.
1. Go to Blogger > Layout.
2. Add a gadget > Add HTML/JavaScript.
3. Copy the below code and Paste into HTML/JavaScript widget.
<div class="widget-content">
<!--[if !IE]> -->
<style>
}
#bbc:hover
 {
border:2px solid #ccc;
cursor:pointer;
}
.opacity
{
opacity: 0.5;
margin-right: 50px;
-moz-transition: all 0.5s ease-out;
-o-transition: all 0.5s ease-out;
-webkit-transition: all 0.5s ease-out;
-ms-transition: all 0.5s ease-out;
transition: all 0.5s ease-out;
-moz-transform: rotate(7deg);
-o-transform: rotate(7deg);
-webkit-transform: rotate(7deg);
-ms-transform: rotate(7deg);
transform: rotate(7deg);
}
.opacity:hover
{
-moz-transform: rotate(0deg);
-o-transform: rotate(0deg);
-webkit-transform: rotate(0deg);
-ms-transform: rotate(0deg);
transform: rotate(0deg);
-moz-box-shadow: 1px 1px 4px #000;
-webkit-box-shadow: 1px 1px 4px #000;
box-shadow: 1px 1px 4px #000;
}
</style>
   <!--[endif]---->

<style>
#bbc
{
border:2px solid #888; margin:2px 5px 0px 0px; padding:2px;
}
#profileAditya:hover
 {
border:2px solid #ccc;
cursor:pointer;
}
.opacity:hover
 {
opacity: 1;
-moz-box-shadow: 1px 1px 4px #000;
-webkit-box-shadow: 1px 1px 4px #000;
box-shadow: 1px 1px 4px #000;
}
</style>
<img class="opacity" id="bbc" src="https://blogger.googleusercontent.com/img/b/R29vZ2xl/AVvXsEgaXcpMdNU7rrDp-FMaEJByN8sl5B5XlKmBg55mVgZkm9MZYtkkt7vCHtXHcIMYe5oGry6RFMsUgaO3uYuZtSebsZMrbzEJcUSMpOwP50P4e3f5EhU_Q16UuJqSo0Iz9yJtjJdqWWveTMSy/s1600/63943_521688851207047_20876973_n.jpg" />
<div style="font-family: Arial Tahoma Verdana; font-size: 13px; text-align: justify; margin-top:-110px; padding-left:120px;">
<b>Founder & Author:</b> The Guy behind this blog is called <b>"ADIL"</b>. I am 24 years old. Currently, I am living in Karachi, Pakistan. I can speak two Languages Urdu and English. I am managing blog myself &amp; I love to..<a style="color:#5634;" href="http://www.earnbloggercafe.blogspot.com/p/about-me.html" target="_blank">...Read More</a></div></div> <!--Please Do not Remove the Credits --><p style=" float:left;  margin-right:35px;  font-size:9px;" >Powered By <a style=" font-size:9px; color:#3B78CD; text-decoration:none;" href="http://www.thebloggercafe.blogspot.com"><strong>Blogger Widgets</strong></a></p></div></div></div>

Customization

  •  Replace the Blue Color image URL with your image URL.
  •  Replace the Red Color about me page link with your about me page link.
  • Replace the Green Color author description with your author description.
You are almost done.

Need Help

If you are facing any problem to add author bio box please let me know in the below comments section.

Top 5 Free Download Premium Blogger Template 2016

By on Saturday, November 14, 2015
Professional Seo Optimized Blogger Template
When you create a blog than your aim to find out best quality and flexible templates to gives professional design of your blog site. You search on the Google search engine to find a top quality and professional template. Once you found that you try to install and at last you get upset, because that template is not according to your needs blog site or word press site. Every blogger want a professional quality blogger template, there are several way to download free blogger template but quality is not everywhere. There is no need to worry I am going to share with you a best 5 free download premium blogger template. Below is the 5 list with demo link and with download link.

 Professional Seo Optimized Blogger Templates Features

  • Seo friendly.
  • Professional design.
  • Drop down menus.
  • Right & Left sidebar.
  • Ad space in the header side.
  • Social sharing sites button. 

 1. Earn Blogger Cafe

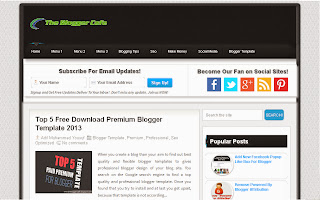
You can see drop down menu, subscribe for email updates, beautiful social sites button, also including page navigation, beautiful header and Seo friendly.

                                                              Live Demo - Download

2. Mash 2

Have a look at this , Awesome features including in this, such as drop down menu, social sharing sites button, professional design, Right sidebar and much more.

                                                               Live Demo - Download

3. Freshable

This is another template you can see features clicking on the demo link from the given below. As well as you can download from the given below link.

                                                            Live Demo - Download

4. Maggner

This is another professional Seo friendly, Hit below on the demo button to check feature.

                                                              Live Demo - Download

5. Pakistani Magazine

This is very cool, If you want to create a blog which provides Pakistani news than you should use this. Have a look at its demo link.


How To Install Blogger Template For Your Blog

It is quite simple and easy to install it on your blog site. Remember first backup your template before upload a new one. learn step by step how to backup.

  • Go to Blogger > Template.
  • Click on the Backup/restore.
  • A popup window will be appear.
  • Hit on the download button.
  • Once you download, You can upload a new one from a file on your desktop or on your download folder.
Enjoy!

Add CSS3 Rounded Border Wrap In Blogger Template

By on Saturday, November 14, 2015
Add CSS3 Rounded Border Body Corner Wrap In blogger Template
CSS3 rounded border corner wrap play vital role to turned your blogger template into professional design. By default blogger template there is no rounded border outside a template. Default template it looks really nasty and has no professional look. It shows that it is not a professional website it is just a website. CSS3 rounded body wrap gives you a professional design and will make more attractive for viewer eyes. You can easily add codes inside your blogger template to gives awesome look. Every blogger want a professional design of blog site so here is a tutorial by which can help you to add stylish rounded corner in blogger widgets. Have a look at this below code.

How To Add CSS3 Rounded Body Corner To Blogger

You can easily add the piece of code in your template. Follow the simple method carefully step by step.

1. Go to Blogger > Template
2. Edit HTML / Now search code ]]></b:skin>
3. Paste the below given code before ]]></b:skin>
#pbtwrap {
      background: #Ffffff;
      width: 960px;
      margin: 10px auto 5px auto;
      padding: 0;
      position: relative;
      border-right: 15px solid #333;
      border-left: 15px solid #333;
      border-top: 10px solid #333;
      border-bottom: 15px solid #333;
      -moz-border-radius:10px;
      -webkit-border-radius:10px;
      border-radius:10px;
      box-shadow: #333 0px 1px 3px;
    }
Now search <body>
Paste the below given code below <body> tag
<div id='pbtwrap'>
Now once again search </body>
Paste the below given code above </body>
</div>

Need Help:

If you still facing any problem to make customize it, Please do not hesitate to ask me in the below comments section, Your comments would be appreciable for us.

Setup Feedburner And RSS Email Subscription For Blogger

By on Saturday, November 14, 2015
How To Setup Feedburner Feed For blog
Feedburner Email & Activate RSS Email Subscription Service is most important play role to increase your blog traffic through reader who read your content. When you publish your post than you need a readers who automatically read your publish post or content. Feedburner Email makes it easy to deliver updates content directly to the readers inbox, if your reader has been activated on your blog RSS feed email subscription service than they get free email updates deliver to their inbox whenever you publish a new post than your readers read your blog updates on the email box and open your blog or website to read content and you will get traffic. Google feedburner is a best known service for your content. It is also known as RSS Feed. So in this article i will tell you how to setup feedburner feed and activate RSS email subscription service in your blog and it will definitely help you to boost your blog traffic. Once you enable feedburner and activate email subscription service. Follow the easy tutorial step by step carefully.

Setup Feedburner Feed

I will tell you everything you need to know by the screenshot for easily understanding.
1. Login your feedburner account.
2. Type your URL and hit on the next button, See below in the screenshot.

Add Your Blog URL
3. Again hit on the next button.
4. Type your blog title and feed address, Click on the next button.
5. Your feedburner feed is now live and it is now created, now again click on the next button.
6. Now tick on the Clickthroughs — How often people click items back to your site, click on the next button.
7. Congratulation you are done.

Activate Customize Feedburner Email Subscription

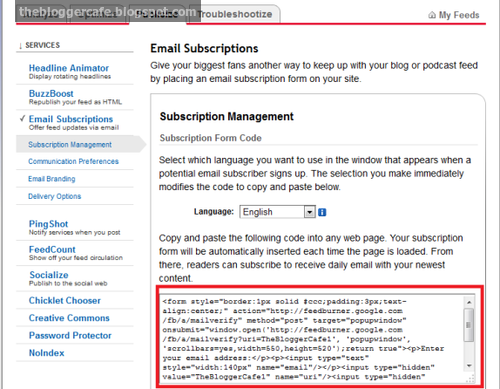
1. Click on the Publicize > Email Subscription tab, Copy the highlighted code and click on the save button. now paste that code into your blogger widget.

Enable Email Subscriptions


2. Go to Blogger > Layout
3. Add a gadget > Add HTML/JavaScript
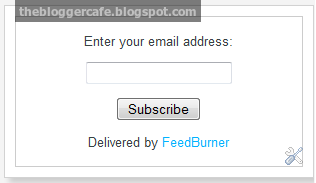
4. Paste the code into HTML/JavaScript widget. Subscribe email address box will be appear it looks like this, see below in the screenshot.

Add Your Email Address


Or you can add the peace of code into HTML/JavaScript widget.
<style>
#socialbar-subscribe-box{width:300px;border:5px solid #aaa;border-radius:3px;padding:3px 0}
.socialbar-subscribe-box-wrapper{background:url(https://blogger.googleusercontent.com/img/b/R29vZ2xl/AVvXsEgz-1DzjFHw4kIOyt28dbDI6Q6V5Kp38Z4JnwbDeTQtn5EHafOtpjECHA2u7AfwtjcyahVK__pYI6MxrwpvxR59HGUuWxhQZe_6WW0xi2tEJNTL7em7EGZlN5ma9WErNp1uTvkFyitl91A/s1600/background.png) repeat scroll 0 0 #f7f7f7;color:#111;font-size:14px;line-height:20px;padding:1px 3px 13px;text-align:center;text-transform:uppercase}
.socialbar-subscribe-box-form{clear:both;display:block;margin:10px 0}form.socialbar-subscribe-box-form{clear:both;display:block;margin:10px 0 0;width:auto}
.socialbar-subscribe-box-email-field{-moz-border-radius:4px;-webkit-border-radius:4px;background:#fff url(https://blogger.googleusercontent.com/img/b/R29vZ2xl/AVvXsEhxvTbT9Xkc97k2io6sLZemBzJ5y5TGgt65HXwyHwrRpku0CtEVdowVw5SNfg7jCW9pLleN3YR1rboaRixwKE_nCEqFNhwVz3M2Maw3Pr-ij8OT034Gq6fGKJz6_QoyqKsgQIXDHMtotFk/s1600/icons.png) no-repeat 0 -27px;border:1px solid #ccc;border-radius:4px;color:#444;margin:0 0 15px;padding:10px 40px;width:68%}
.socialbar-subscribe-box-email-button {
background: rgba(0, 153, 255, 0.31);
border: 1px solid #007fff;
-moz-border-radius: 15px;
-webkit-border-radius: 15px;
box-shadow: 0 1px 0 rgba(255,255,255,0.3) inset, 0 1px 0 transparent;
color: #fff;
cursor: pointer;
font-family: verdana;
font-weight: 700;
padding: 10px;
text-shadow: 1px 1px 0 rgba(0,0,0,.4);
text-transform: uppercase;
width: 100%;
}
.socialbar-subscribe-box-email-button:hover,.socialbar-subscribe-box-email-button:focus{background:#1ca4ff}
.socialbar-subscribe-box-email-button:active{-moz-box-shadow:0 1px 4px rgba(0,0,0,0.5) inset;-webkit-box-shadow:0 1px 4px rgba(0,0,0,0.5) inset;box-shadow:0 1px 4px rgba(0,0,0,0.5) inset;outline:0}iframe,object,embed,.yt-border iframe,.yt-border object,.yt-border embed,table{width:100%}embed{border-radius:3px;-moz-box-shadow:0 2px 4px rgba(0,0,0,0.2);-webkit-box-shadow:0 2px 4px rgba(0,0,0,0.2);background:#FFF;border:1px solid #ddd;box-shadow:0 2px 4px rgba(0,0,0,0.2);margin:0;padding:4px 4px 4px}
#footer-section{border-top:1px solid #aaa;box-shadow:inset 0 4px 6px -3px #aaa;font-family:cambria;font-size:14px;height:100px;margin:10px -30px 5px;padding:0 30px;text-align:center;width:100%}
a.social-icons{margin-right: 5px;height:45px;width:45px;}
a.social-icons:hover { opacity: .7; filter:alpha(opacity=70);}
</style>
<div id="socialbar-subscribe-box">
<div class="socialbar-subscribe-box-wrapper">
<br/>
<a class="social-icons" target="blank" href="https://www.facebook.com/earnbloggercafe" rel="nofollow"><img src="https://blogger.googleusercontent.com/img/b/R29vZ2xl/AVvXsEjLcmzN48EG1OJK8uWCpsYoUEUK6R-41mOo86jD6_87pg9yOVBWyhViso3E34ZoO1snmRiv-mS24VX_jNlpzztAm0u4kfrpsFrvhVlfUlFYLDInvBoqWwr6WTaVGsdkFFVM6QFcrvLFcenA/s1600/facebook_64.png" /></a>
<a class="social-icons" target="blank" href='http://feeds.feedburner.com/EarnBloggerCafe' rel='nofollow'><img src='https://blogger.googleusercontent.com/img/b/R29vZ2xl/AVvXsEgHtMjKyyLoHciNtvMXNn5p3kz1kV0QOY5QlQbwt1ptbabw7SzExvS4b5qyD2C5wXR9ORQOrvfuS_EGEAfY4gwXKGzrEjQwA4EgPmZCHzD2kcMZLPAL8HsnfbX4BznqsYBUw19bj071bl73/s1600/rss_64.png' title='Rss'/></a>
<a class="social-icons" target="blank" href="https://plus.google.com/108753831752159698538" rel="nofollow"><img src="https://blogger.googleusercontent.com/img/b/R29vZ2xl/AVvXsEiIG3h8RGS10xPs9RIsOLXMVKADuyskTTAA4Xb0I55F1FopS2XQqQJpoojhr3CBiULUulyPYcKH1Wa2IOXpMXxyvpphyPLWewZEHKW5rpMSNh2Zm2WIRLqAT4H68sDOZkIs7O8NiyFK3LPW/s1600/google-plus_64.png" /></a>
<a target="blank" class="social-icons" href="http://www.pinterest.com/adil100" rel="nofollow"><img src="https://blogger.googleusercontent.com/img/b/R29vZ2xl/AVvXsEheo1kJ32V6v1s-ENT_weV4HKccLieEHaAPC4swLGL-NXPtWQoBhoVt2blIAXW5UFl7ZtFdGnGnB4Vhuzqvcla4RTqQk8VDBTuZ9nA5-AYCEQQ5s4hgJi8AIM3JKimwn5PRbdc-2Y0SXlA_/s1600/pinterest_64.png" /></a>
<p><strong>Become Our Fan on Social Sites!</strong></p>
<div class="socialbar-subscribe-box-form"><form action="http://feedburner.google.com/fb/a/mailverify?uri=EarnBloggerCafe" class="socialbar-subscribe-box-form" method="post" onsubmit="window.open('http://feedburner.google.com/fb/a/mailverify?uri=TheBloggerCafe', 'popupwindow', 'scrollbars=yes,width=550,height=520′);return true" target="popupwindow"><input name="uri" type="hidden" value="TheBloggerCafe" />
<input name="loc" type="hidden" value="en_US" /><input class="socialbar-subscribe-box-email-field" name="email" autocomplete="off" placeholder="Enter Your Email Here"/>
<input class="socialbar-subscribe-box-email-button" title="" type="submit" value="Subscribe Now !" /></form></div></div></div><!--Please Do not Remove the Credits --><p style=" float:left;  margin-right:35px;  font-size:9px;" >Powered By <a style=" font-size:9px; color:#3B78CD; text-decoration:none;" href="http://www.earnbloggercafe.blogspot.com"><strong>Blogger Widgets</strong></a></p></div></div></div>

Customization

Please change the highlighted URL with your URL, you are almost done!

Redirect All Your Blog Feed To Feedburner

Once you setup feedburner and activate RSS email subscription for your blog than you need to redirect your blog feed. Follow the simple step.
  • Go to Blogger > Other > Setting
  • Enter your feedburner URL in the Post Feed Redirect URL text field.
  • Hit on the save button.
  • You are done.

Help

You can feel free to ask me at anytime in the below comment section.

Optimize Images Tips For Better Search Engine Visibility

By on Saturday, November 14, 2015
Image Optimization
Optimize images is play vital role for improve SEO ranking in blogging career and It help us to boost traffic in Google search engine, Most of bloggers newbie doesn't know how to do that and how it could become more exposure for our blog. As we all know that how to optimize blog post in search engine to increase blog traffic. So today I am going to tell you how to optimize blog images for better search engine visibility. Most of bloggers and webmaster find out photos or pictures from Google image search for their blog post and if your blog images has already been optimized, It will give you advantage to bring traffic from Google image search. Remember always optimize your images before publishing a post.

How To Use/Add Title Text & Alt Text To Optimize Images:

It is quite easy tutorial to image optimization in search engine using add title text and alt text. Below are some important tips.

Title text and alt text is most important techniques which helps you to quick optimize images in Google search engine. Always try to use proper and select your best keyword in title text and alt text. Don't use to many keyword in this. I will teach your step by step with screenshot.

Go to Blogger > Dashboard
Write a new post.
Insert an image.
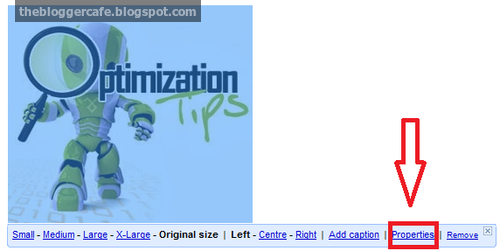
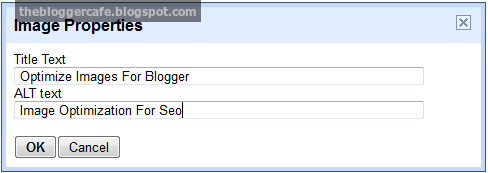
When you click on insert image a popup window will appear. see below in the screenshot for better understanding.

Add Title text & Alt text

Add your title text and alt text, It looks like this see below in the screen shot.

Use Select Best Keyword
Hit on the OK button and you almost done.

Use Title text and ALT text while using images into your blog post. It will definitely help you to increase your blog rank.

Use Proper Keyword In Image Name

I saw most of bloggers and word press developer newbie download images from Google & internet for their blog post than they use that images directly into their post without rename. Don't do that! It will bad impact for your SEO, First rename the image name into proper keyword. By default images name look like this index, untitled url1, photo1, picture1 etc. I give you a simple example: In this article I am using image for this post so I will give my image name optimize-images-for-better-seo-ranking.

Use Best Image Format

Never use bad images format for your blog or website like TIFF, PNG, GIF & BMP etc.Otherwise your blog loading time will increase and it will bad impact for search engine ranking of your blog. JPG image format is a best format for blogger and webmaster because it uses less size memory as compare to other formats. JPG image format helps you to reduce your blog loading time and it will quickly load when someone open your blog.

Final Words

Friends, It is a most important information for both blogger and blogger newbie. If you have any question regarding this, you can ask me in below comments. Keep visiting us for more info and signup with us to get free updates deliver to your inbox.